

If you’re still relying on old Universal Analytics habits or you’re setting up website tracking for the very first time, Google Analytics 4 can feel like a different animal altogether. It doesn’t just measure pageviews the way the old system did. It tracks events, and that single shift changes how you think about your entire website or app. This guide walks you through the setup process step by step, explains why each stage matters, and shares a few lessons that only become obvious once you’ve actually gone through the process yourself.
Why Google Analytics 4 Works Differently
Universal Analytics was built around sessions and pageviews. GA4 was built around events. Every single interaction, whether it’s a click, a scroll, a video play, or a form submission, gets logged as an event with its own set of parameters. This means the data model underneath GA4 is far more flexible, but it also means the setup process asks a bit more of you upfront.
The good news is that once you understand this event based structure, everything else about the platform starts making sense. You stop thinking in terms of “how many people visited this page” and start thinking in terms of “what did people actually do while they were here.”
Step One: Create Your Google Analytics 4 Property
Before anything else, you need a property. If you already have an old Universal Analytics account, log into your Google Analytics dashboard and look for the admin panel in the bottom left corner. From there:
- Click on “Create Property”
- Enter your business name, reporting time zone, and currency
- Fill in details about your business, such as industry category and company size
- Choose your business objectives, which helps Google tailor your default reports
Google Analytics > Create property > Business Infromation > Create data stream
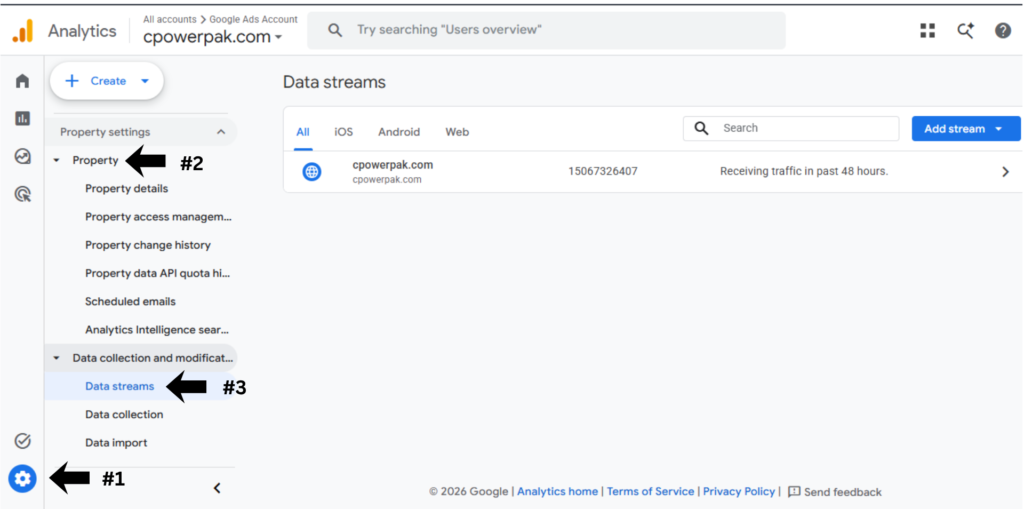
Once this is done, you’ll land on a screen asking you to set up a data stream. This is where things get interesting, because GA4 treats websites and mobile apps as different types of data streams within the same property.
Choosing the Right Data Stream
If you’re tracking a website, select the web option and enter your site URL along with a stream name that makes sense to you. For example, naming it “Main Website” is far more useful six months from now than naming it “Stream 1.”
For businesses running both a website and a mobile app, you can add multiple streams under one property. This is actually one of GA4’s biggest advantages over the older system: you get a unified view of user behavior across platforms instead of juggling separate accounts.
Step Two: Install the Tracking Code
Once your data stream is created, Google generates a Measurement ID, something that looks like G-XXXXXXX. This ID is what connects your website to your GA4 property.
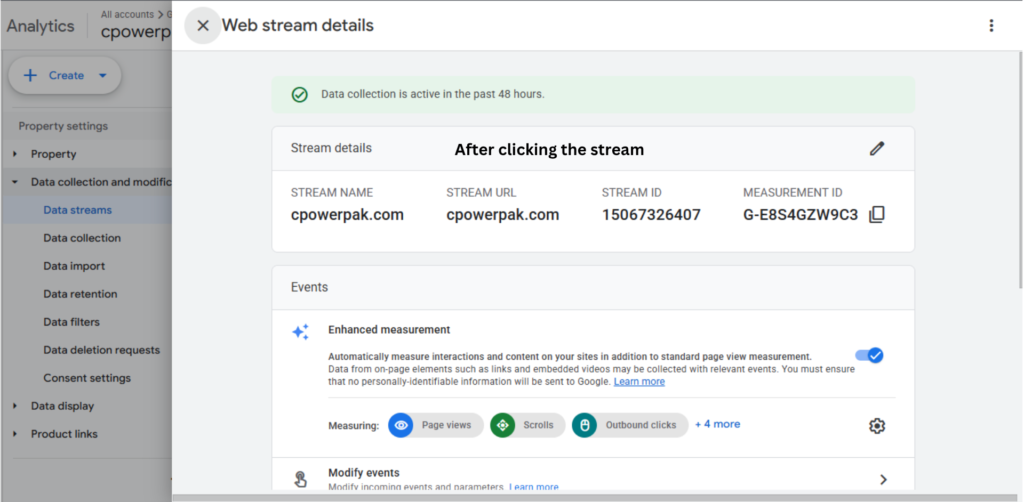
There are three common ways to install it:
Direct installation through your website’s HTML. You paste the global site tag into the header of every page you want tracked. This works fine for smaller sites but becomes tedious for larger ones.
Using Google Tag Manager. This is the method most marketers and developers prefer because it lets you manage all your tracking tags in one place without touching your site’s code every time you want to add or adjust something.
Through a content management system plugin. If you’re on WordPress, Shopify, or Wix, there are usually built in fields or plugins where you simply paste your Measurement ID and the platform handles the rest.
If you’re not entirely sure which route to take, Tag Manager tends to save the most headaches down the road, especially once you start adding conversion tracking, custom events, and third party marketing pixels.
Step Three: Understand and Set Up Data Streams Properly
A lot of guides skip over this part, but data stream settings hold more power than people realize. Inside each stream, you’ll find “Enhanced Measurement,” a toggle that automatically tracks things like scroll depth, outbound link clicks, site search, video engagement, and file downloads without needing any custom code.
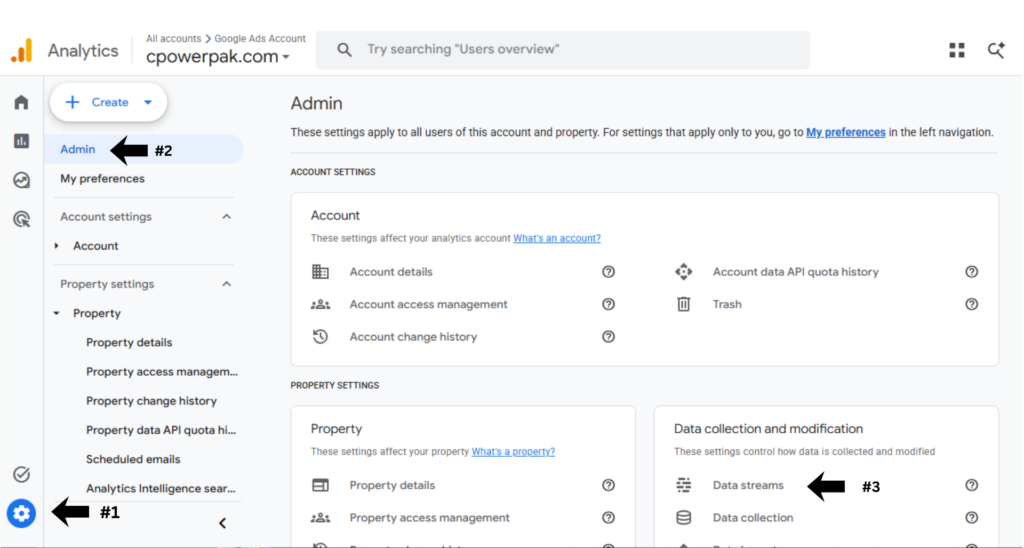
Turning this on is usually a smart move because it gives you a baseline layer of behavioral data immediately. But be aware that some of these automatic events can clutter your reports if you’re not careful, particularly the outbound click tracking on sites with a lot of external links, like blogs that cite sources frequently.
A Practical Tip Most Guides Miss
One thing that trips people up is assuming Enhanced Measurement replaces the need for custom event tracking. It doesn’t. It’s a starting point, not a finish line. If your business depends on specific actions, like newsletter signups, product configuration tools, or multi step checkout flows, you’ll still need to build custom events around those actions specifically.
Step Four: Set Up Conversion Events
Conversions in GA4 aren’t automatic goals like they were in Universal Analytics. Instead, you mark certain events as “key events” (previously called conversions) inside the admin panel under Events.
Visitor > Visits Website > Views Product > Clicks Contact > Submits Form > GA4 Records Key Event > Conversion Report
To do this properly:
- Navigate to Admin, then Events
- Find the event you want to mark, such as “purchase” or “generate_lead”
- Toggle the “Mark as key event” switch
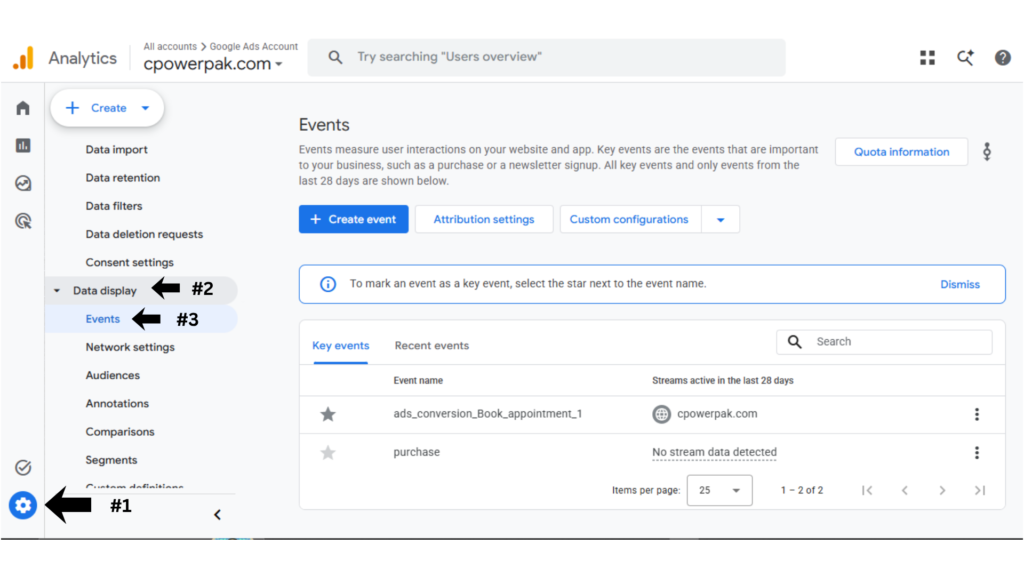
If the event you need doesn’t already exist because it hasn’t fired yet, you may need to trigger it once on your live site so GA4 registers it, or you can create it manually through Tag Manager first.
A common mistake here is marking too many events as key events right away. Doing this dilutes your reporting and makes it harder to identify what actually matters to your business. Start with two or three core actions that reflect real business value, then expand from there once you understand your traffic patterns better.
Step Five: Link Google Ads and Other Platforms
If you’re running paid campaigns, linking your Google Ads account to GA4 is one of the most valuable things you can do early on. This connection allows conversion data to flow back into your ad account, which improves bidding decisions and gives you a clearer picture of return on ad spend.
To link accounts, go to Admin, then Product Links, and select Google Ads. From there, you choose which ad account to connect and which conversions should be shared back.
Beyond Google Ads, you can also connect:
- Google Search Console, for organic search query data
- BigQuery, for advanced data exports and custom analysis
- Google Merchant Center, if you run an ecommerce store
Each of these integrations unlocks a layer of data that simply isn’t available if you rely on GA4 alone.
Step Six: Build Custom Events for What Enhanced Measurement Misses
This is where GA4 setup really separates casual users from people who get genuine value out of the platform. Enhanced Measurement handles the obvious stuff, but your business likely has actions that matter specifically to you.
Say you run a coaching business and want to track when someone books a discovery call. Or you run an online store and want to know when someone applies a discount code versus when they abandon their cart after seeing shipping costs. These require custom event setup, usually through Tag Manager.
The general process looks like this:
- Identify the specific user action you want to track
- Create a trigger in Tag Manager that fires when that action happens, such as a button click or form submission
- Create a tag that sends a GA4 event when the trigger fires
- Add relevant parameters to the event, like button text, form name, or product category
- Test everything using Tag Manager’s preview mode before publishing
User Visits Website > Performs an Action(Button Click / Form Submit /Purchase / Newsletter Signup) > Google Tag Manager Trigger > GA4 Event Tag Fires > Send Custom Event to GA4 > Verify in DebugView > Mark as Key Event (Optional) > Track Performance in Reports
Testing is not optional. Skipping this step is how businesses end up with months of broken or duplicated data that has to be cleaned up later, and cleaning up historical analytics data is far more painful than testing properly the first time.
Step Seven: Set Up Audiences for Remarketing and Segmentation
Once your events are firing correctly, audiences become one of the more underused features in GA4. Audiences let you group users based on behavior, such as people who viewed a product page but didn’t purchase, or people who visited three or more times in the past thirty days.
These audiences can feed directly into Google Ads for remarketing campaigns, which is particularly useful for ecommerce businesses trying to recover abandoned carts or service businesses trying to re engage past website visitors.
To create one, go to Admin, then Audiences, and click “New Audience.” You can start from a template or build one from scratch using specific conditions related to events, pages visited, or user properties.
Step Eight: Data Retention and Privacy Settings
This step gets overlooked constantly, but it matters more than people think. By default, GA4 retains user level data for only two months, which is far shorter than most businesses expect. If you want to run year over year comparisons or longer term behavioral analysis, you need to manually extend this setting.
To adjust it, go to Admin, then Data Settings, then Data Retention, and change the setting to fourteen months, which is currently the maximum allowed.
On the privacy side, make sure your consent settings align with regulations relevant to your audience, particularly if you have visitors from the European Union. Google offers Consent Mode, which adjusts how data is collected based on whether a user has accepted cookies, and setting this up properly protects both your compliance standing and your data accuracy.
Common Mistakes Worth Avoiding
A few patterns show up again and again when businesses set up GA4 without guidance:
Not filtering internal traffic. If your own team visits the website regularly for testing or content updates, that traffic skews your reports unless you exclude it through IP filtering or internal traffic rules.
Ignoring the debug view. GA4 has a built in DebugView under Admin that shows real time event data as it fires. Most people never open this, yet it’s one of the fastest ways to confirm your setup is actually working before you wait days for standard reports to populate.
Setting up too many custom dimensions too early. Custom dimensions in GA4 are limited in number depending on your account type. Businesses that add dozens of dimensions in the first week often run out of room later for genuinely useful ones.
Forgetting to document what was built. Six months from now, neither you nor your team will remember why a particular event exists or what parameters it captures unless it’s written down somewhere. A simple shared spreadsheet listing each event, its trigger, and its purpose saves enormous time later.
Final Thoughts
Setting up Google Analytics 4 properly takes more patience than the old Universal Analytics system ever did, but the payoff is a much richer understanding of how people actually use your website or app. The platform rewards businesses that take the time to plan their events thoughtfully rather than just flipping on Enhanced Measurement and calling it done.
Start with the basics: get your property created, install tracking correctly, and confirm data is flowing through DebugView. From there, build out custom events tied to what actually matters for your business, connect the platforms that expand your data, and revisit your setup every few months as your website or app evolves. Analytics isn’t something you configure once and forget. It’s a living part of how you understand your audience, and treating it that way from the start will save you a lot of guesswork later.
Learn more about How to Optimize Your Google Business Profile: Complete Guide or How to Measure Marketing ROI for Business